Perennial.
It’s a word that even the most amateur gardeners have heard over and over again. For the few who haven’t, however, perennials are all around you any time you step out the door. They beautify landscapes due to their sheer variety, adding thrilling new textures to gardens and landscapes.
What some people may not realize, though, is that it’s quite easy to germinate and cultivate perennials yourself instead of buying them pre-grown.

First things first: what are perennials?
Perennials encompass a shocking range of plant families and genera, but they’re broadly defined as plants that live more than two years. Whether or not a plant fits that definition, however, is often dependent on climate and hardiness. A purple fountain grass (Pennisetum rubrum), for example, is considered a perennial in warmer climates, but in any climate that’s likely to reach -10 degrees Celsius, it would be considered an annual (a plant whose life cycle comprises only one growing season).

So, when selecting perennials for your garden, it’s important to familiarize yourself with each plant you choose, to understand hardiness zones, and to get to know the three different types of perennials:
- Herbaceous perennials are plants that have foliage and stems that grown and bloom in the spring/summer, but die back into the ground during fall/winter. Common examples include:
- Sword fern*
- Deer fern*
- Day Lily
- Hosta
- Pacific bleeding heart*
- Wild ginger*
- Goatsbeard*
- Wild hellebore*


- Woody perennials are plants and shrubs that have above-ground woody stems – including trees and shrubs. Common examples include:
- Oregon grape*
- Bearberry*
- Salal*
- Vine Maple*
- Salmonberry*
- Rhododendrons*
- Azaleas


- Evergreen perennials are non-woody and have foliage and stems that remain through the year. Common examples include:
- Lilyturf
- Bergenia
- Coral bells


(*indicates a native perennial, or a perennial that has at least one variety native to BC)
Germinating Perennials: An Overview
Germination – the process by which a plant grows from a seed – is a rewarding and inexpensive task that can be much easier than you think. Though most people are tempted to simply purchase perennials already grown from garden centres or nurseries, germinating seeds yourself takes only a little knowledge — and a bit of time.
One of the most common methods for germinating perennials involves using “milk jug greenhouses.” This process involves:
- collecting semi-transparent milk jugs
- cutting off the tops
- filling them with a pre-watered, nutrient-rich potting soil
- planting seeds just below the surface of the soil
- taping the top of the milk jug back on
- labeling each milk jug
- setting them outside in a sunny location, watering lightly, until they germinate

In this process, each milk jug acts as a greenhouse for the seeds, keeping them warm and allowing condensation to build while exposing them to the necessary weather conditions they’ll need to survive. It’s a proven method that works well for a variety of plants, and it helps seedlings transition slowly from being indoors.
However, when germinating native perennials, there’s a simpler process that often yields better results. Keep reading…
6 Tips for Germinating Native Perennials
For starters, native perennials can be germinated most successfully when they’re exposed directly to the winter conditions in which they’ll later exist. With that in mind, here’s a great process for germinating native perennials!
Tip 1: Start by picking up the seeds you need
This will take some investigation. You’ll need first to research native plants, taking into consideration where they’ll eventually be planted and what conditions they’ll need to thrive. Truly native plants should survive just about anywhere local, but check nonetheless!
Tip 2: Use cell trays instead of milk jugs
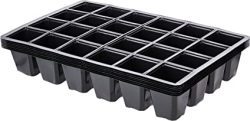
A typical seed tray.
This method rejects the use of milk jugs in favour of cell trays or seed trays, which will help expose the seedlings directly to the winter elements. Once you know how many different types of seeds you’re using and how much space they’ll need, you can figure out how many cell trays to get. A seed tray with a deep bottom is best.
Tip 3: Use a well-draining, nutrient rich soil
Finding a coarse, healthy potting soil is easy; we’d recommend going to a local garden centre and asking for recommendations.
Tip 4: Plant the seeds just below the surface
Check the recommended depth for each seed; most of them are best planted within and inch of the top of the soil. For additional drainage, sprinkle a little coarse sand into the soil after planting.

Tip 5: Put directly outside during late winter – no need to start the seedlings indoors!
Counter-intuitive, I know. It’s important that native seeds are directly exposed to the elements in which they’ll later grow in order to acclimate them, and most native seedlings tend not to need much coddling. However, still ensure you leave them somewhere they’ll get lots of sun. Non-shaded, south-facing locations are ideal.
Tip 6: Once the plants show growth, they’re ready to be moved.

How Can We Help?
Need advice on perennials? We’d be happy to help with any questions, recommendations, garden design ideas, and more.
Get in touch for more information.
Comments are closed here.