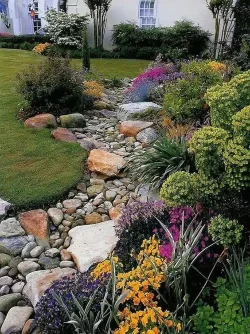
Dry streams: small-scale, empty versions of actual rivers.
You’ve likely seen them before, but perhaps haven’t really noticed. That’s by design: the best dry streams fit seamlessly and naturally with the landscape, appearing as though they’ve always been there, effortlessly demarcating garden beds with their rugged appeal and alpine beauty.
So, how do you install one? And how do you make it look natural?

What are dry streams, and what do they do?
Dry streams are an ornamental solution to a functional problem: drainage.
When installed properly, dry streams can collect and direct rainwater runoff that might otherwise simply sit in puddles on the surface, dispersing it to nearby plants or allowing it to filter into the ground. In that sense, dry streams and rock beds are a highly sustainable, relatively inexpensive solutions to drainage woes that also add variety and texture to your garden.
Physically, a dry stream is a slender, winding gully dug down into your lawn or garden, which is then filled with round, free-draining river rock and interspersed with larger boulders throughout. Typically, dry streams also incorporate a variety of plants (creeping groundcovers and ornamental grasses along the edges are especially common), and can even include thirstier plants installed in the creek bed itself.
It sounds relatively simple, but dry streams can be labour intensive, and possibly even dangerous, to install. Have fun with it, but proceed with caution.
How to install a dry stream
Step 1: Planning and marking your dry stream
Identify where you’d like your dry stream to go, carefully considering where it fits naturally in your landscape. If the intent of your dry stream is purely ornamental, you can get a little creative with location. However, if it’s being used to alleviate drainage issues, make sure you consider the natural high and low points of your garden and how they interact with one another.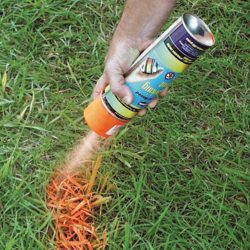
Next, use marking paint to draw the edges of your stream. Keep in mind the following:
- Think about the width of your dry stream. If it’s part of a very wide garden, a narrow stream might be dwarfed by the surrounding landscape. The size should be appropriate for the space.
- Real creeks and rivers never travel in a perfectly straight line. Your dry stream shouldn’t either.
- Real creeks and rivers follow natural, flowing curves. Make sure your layout looks realistic, containing no sharp angles or visually distracting, unnatural corners.
- If you’re working around existing plants that cannot be transplanted elsewhere, plan the curves of your dry stream around them. Give trees with large roots a wide berth whenever possible.
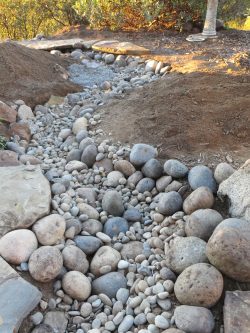
Step 2: Excavation
Once you’re happy with your layout, you can start digging!
The centre of your stream should be its deepest point, so start by digging a narrow trench down the middle, then dig out the sides to slope down into a natural basin. Your final depth will depend on how wide you plan to make your dry stream; the wider the stream, the deeper its bottom will likely need to be. Ultimately, though, it’s up to you!

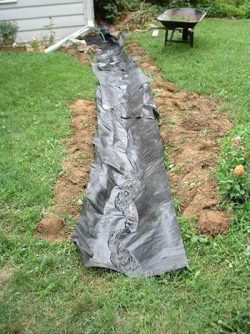
Step 3: Add landscape fabric (filter cloth)
This step is optional, but highly recommended. Putting landscape fabric along the bottom of your dry stream will prevent weeds from popping up through the rocks later.
Step 4: Add boulders
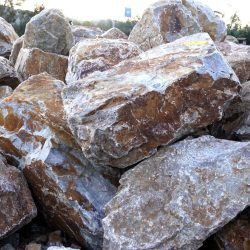
This is where it gets tricky – and, if you don’t know what you’re doing, a bit dangerous. We highly recommend bringing in a professional to help with this step.
Boulders, typically made of granite or basalt, can be picked up at or delivered by some suppliers. Once you have them in your yard, they’ll first need to be placed. It’s typical to place them along the bends of your dry stream in clusters of 1-3. Alongside the curves of your river, where water would theoretically hit your boulders and change directions slightly, is a good place to put them, but it takes a practiced eye to do this well! Consult photos of other dry streams for ideas.
Once you’re happy with your boulder configuration, you’ll have to dig down and set them in the ground. In nature, boulders don’t simply sit on the surface of the soil; neither should yours.
For more detail, click here for a guide to boulder sizes, selection, shapes, and arrangements.
Step 5: Add River Rock
We’d recommend going with a bulk supplier for this – buying bags of river rock from a garden centre can get extremely costly. Visiting a bulk supplier is less expensive, but you’ll need a truck that can handle some weight to pick it up.
Alternatively, many bulk suppliers can deliver large bags containing 1 cubic yard of river rock, which you can then install yourself using a wheelbarrow. Suppliers may also be able to help you estimate how many yards of rock you’ll need.
River rock comes in a range of sizes; 1-2 inch and 2-6 inch are common. A mix of large and small rocks is best. Once they’re in your river, they’ll need to be arranged: smallest rocks near the bottom of the riverbed, larger rocks along the edges. This can be time consuming and a little tedious, but the results are always worth it!
Step 6: Adding Soil and Plants
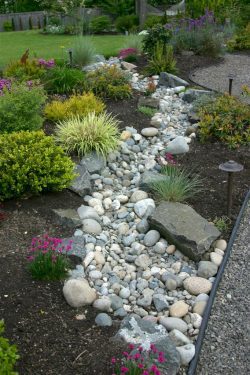
No dry stream would be truly complete without the colours and textures offered by plants which help offset the rugged stoniness of your dry stream.
Adding graded soil to the gardens along the edge of your dry stream that slope down into its basin can help with drainage. Adding plants lends consistency and unity.
Here’s a few plants that typically look good right along the edges, or even in, a dry stream:
- Sweet flag (Acorus)
- Creeping jenny (Lysmachia)
- Periwinkle (Vinca minor)
- Sedges (Carex)
- Fountain grasses (Pennisetum)
- Hostas (Hostas)
- Heather (Erica carnea)
- Ferns
- Rushes
Making it look natural
Dry streams are extremely rewarding projects that have the power to significantly beautify your landscape. They’re likely interspersed through your nearby landscapes in parks, strata complexes, and even in neighbour’s yards.
If you’d like a dry stream installed at your property, please don’t hesitate to get in touch! We’d love to give you a hand.
Comments are closed here.